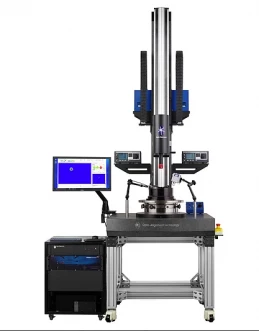
LAS-UP-VIS-2xIR
Description
The LAS-UP-VIS-2xIR™ is a 0.5m-sized, non-contact lens alignment and inspection station designed from the ground-up for precision lens centration and tilt measurements of single element, doublet, triplet and multi-element MWIR/LWIR lens assemblies with radius ranging from +/- 1 mm to infinity (plano) and diameters from below 1 mm to 600 mm, including spherical, aspheric, cylindrical and parabolic surfaces. All this can be done with a single objective lens allowing for fast and easy measurement. The core measurement technology is based on focused laser reflection (see LAS Technology). A single-mode optical fiber couples the external Laser Generation Module (LGM) to the on-tool vertically-mounted Optical Module (OM) which houses the focusing optics and large-format array camera(s). Software control of the LGM permits fast switching of wavelengths and optimization of the beam power, resulting in superior imaging of the reflected beam with sub-micron measurement precision. The design of the LGM permits up to two of three visible wavelengths (blue, green & red) and two infrared wavelength (MWIR and LWIR).
LAS-UP-VIS-2xIR
Specifications |
|
|---|---|
| Vertical Focusing Range: | 2000 mm |
| Measurement Resolution: | 0.1-0.1um |
Applications
Centering of single MWIR/LWIR lenses
Cementing MWIR/LWIR lens doublets & triplets
Centering & bonding of multi-element MWIR/LWIR lens assemblies
Alignment Inspection of infrared multi-lens assemblies (requires CalcuLens™ Inspection)
Measurement of lens vertex height and air gaps (requires CalcuLens™ Vertex)
Measurement of lens Radius of Curvature (requires CalcuLens™ ROC)
Measurement of infrared lens and assembly beam deviation (requires CalcuLens™ BD)
TIR profiling of rotationally symmetric housings and cells (requires CalcuSurf-1D™)
For pricing, technical or any other questions please contact the supplier
- No registration required
- No markups, no fees
- Direct contact with supplier
-
Ships from:
United States
-
Sold by:
-
On FindLight:
External Vendor

Claim Opto Alignment Page to edit and add data
Frequently Asked Questions
The LAS-UP-VIS-2xIR can also measure lens vertex height and air gaps, lens radius of curvature, infrared lens and assembly beam deviation, and perform TIR profiling of rotationally symmetric housings and cells with the optional CalcuLens™ Vertex, CalcuLens™ ROC, CalcuLens™ BD, and CalcuSurf-1D™ software, respectively.
The LAS-UP-VIS-2xIR is a non-contact lens alignment and inspection station designed for precision lens centration and tilt measurements of single element, doublet, triplet, and multi-element MWIR/LWIR lens assemblies.
The core measurement technology is based on focused laser reflection, which allows for superior imaging of the reflected beam with sub-micron measurement precision.
The user-friendly CalcuLens™ Assembly software is standard to all LAS™ models and enables computer-automated measurement of the alignment errors of a single lens for rapid bottom-up assembly. Extending the measurement to multi-element lens assemblies requires the optional CalcuLens™ Inspection software, which adds powerful inspection capability for the quality assurance of finished lens assemblies.
The LAS-UP-VIS-2xIR can measure lenses with radius ranging from +/- 1 mm to infinity (plano) and diameters from below 1 mm to 600 mm, including spherical, aspheric, cylindrical, and parabolic surfaces.

